Security in the cloud is a priority for every organization
planning to adopt public cloud for mission critical applications. In Azure,
these security concerns are addressed at different layers starting from the
platform layer up to the VM OS layer. This picture shows an overview of the
different layers of security in Azure

Any traffic directed to your applications hosted in Azure will first hit the platform's native DDOS protection mechanism.
If a DOS attack is happening a specific IP is targeted, the DDOS protection
mechanism will blackhole the traffic and the endpoint will be brought down.
Thereby the surrounding resources will be protected. If you have resiliency
built in, you can bring up another endpoint and ensure that your service is
available
At the next layer you have endpoints, ie traffic will be received only at the designated endpoints in case of classic model, or as defined in NSGs in case of ARM model. The VMs can be placed in different virtual networks which are isolated from each other by default. Inside Vnet you can use NSGs and UDRs to manage traffic. If you want to notch up the security one level higher , you can introduce Virtual Network Appliances in your network.For eg: Firewalls, IDS/IPS devices etc that are available in the Azure marketplace.
In this blog , I am going to talk about security at the VM layer, ie encryption of your data at rest using disk encryption. This is achieved using Bitlocker encryption of Windows VMs and DMcrypt in Linux VMs. It leverages Azure KeyVault services to store your encryption keys which is again an additional level of security. The process is quite straight forward and encryption can be done for new as well as existing VMs. In case of Windows IaaS VMs, we can encrypt both the OS and Data disk, while in case of Linux IaaS VMs the data disk can be encrypted.You will have to use the ARM deployment model to leverage this feature, since it does not work with the classic model. There are ARM templates readily available in GitHub that can readily help you with the encryption of existing and New VMs.
Let us take a look at the steps to be done to enable OS and Data disk encryption of IaaS windows VMs in Azure
Prerequisites:
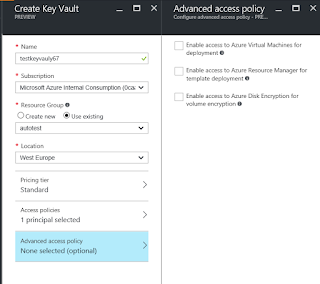
1) Create an Azure KeyVault
This can be now done from the ARM portal itself. KeyVault is available in the Azure Portal in preview mode. You can create a new keyVault by providing basic information like KeyVault Name , Resource group Name,Location etc. In addition to that , by default your user account will have access in the "Access Policies". You can edit the "Advanced Access Policy" and enable all the three options given there

Alternately, you can also use the ARM template available at this location to create a KeyVault:
This template will create a KeyVault for you with all the three advanced access policies including the Volume encryption policy that we need for Disk encryption.
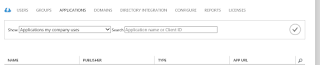
2) Create an application in Azure AD with permission to access KeyVault:
This is a very important step since you will be using this application id and key during VM encryption
1. Select the organization's active directory from the classic portal and select the application tab
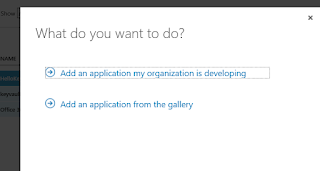
2.:Click on add from the bottom menu to add a new application. Select the first option, ie add an application my organization is developing
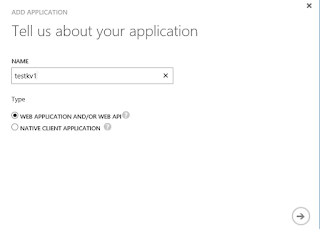
3. Provide name of the application in the next step
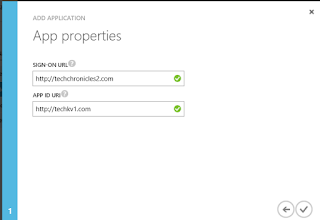
3. Add the Sign-on URL and App URI. You can enter any value here in URI format, it need not have to be an existing application. Only requirement is that it should be unique for an organization
4.Now click on configure, and copy the client Id of the application

5.Next we need the application key. This can be generated from the portal from under the keys session. Select duration as 1 year from the drop down. Once you save the configuration, a key will be displayed which can be copied over

6. Next step is to provide this application access to keyvault. It can be done from an Azure PowerShell window using the following command
Set-AzureRmKeyVaultAccessPolicy -VaultName $keyVaultName -ServicePrincipalName $aadClientID -PermissionsToKeys 'WrapKey' -PermissionsToSecrets 'Set' -ResourceGroupName $rgname
You have to set the variables $keyVaultName,$aadClientID,$rgname to have values of your keyvault name, client id of the application that we got at Step 4 above and Resource group name
Now you have the client id and the key that you will need during the ARM template execution. Now lets proceed with the VM disk encryption
Create a new encrypted VM using ARM template and KeyVault
Deploy the following template available in GitHub to encrypt a new VM : https://github.com/Azure/azure-quickstart-templates/tree/master/201-encrypt-create-new-vm-gallery-image
Click on the "deploy to Azure" option in the page to deploy the ARM template directly in Azure
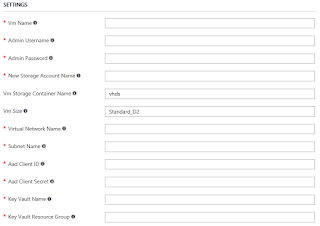
Provide the mandatory parameter values like VM name, admin username, password, Storage account name, Virtual network, subnet,keyvault name and keyvault resource group along with the client ID and Client Secret of the Azure AD application that we created earlier. Additionally there will be two options for Key Encryption key and URL.It is not mandatory and we are not using that in this example. You can then agree to the terms and conditions , click on purchase and the deployment of encrypted VM will start
Encrypt an existing VM using ARM template and keyvault
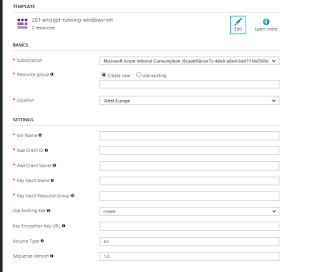
Deploy the following template available in GitHub to encrypt an existing VM : : https://github.com/Azure/azure-quickstart-templates/tree/master/201-encrypt-running-windows-vm
Deploy the template to Azure and provide details of the VM that you want to encrypt.'Volume type' can be OS,Data or All(default value) depending on which disk you want to encrypt
Check encryption status
Now that you have enabled the encryption you might want to verify the status. There are few ways to check this.
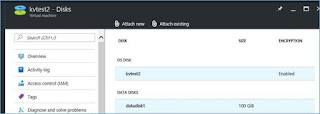
Easiest way is to check from the Azure portal.Navigate to the Disks information of the VM from the portal. It will show the OS disk status as Encrypted.
The data disk encryption status is currently not reflected in the portal. However, you can check the data disk encryption status by using Azure PowerShell command Get-AzureRmVmDiskEncryptionStatus and providing resource group name and Vmname as parameters
Get-AzureRmVmDiskEncryptionStatus -ResourceGroupName $rgname -VMName $Vmname
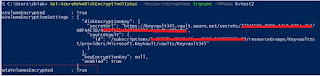
You will see OSVolumeEncrypted and DataVolumesEncrypted status as True if encryption is enabled
You can also check the status of disk encryption from within the VM using ‘manage-bde’ command and providing the drive letter as parameter. Sample output given below
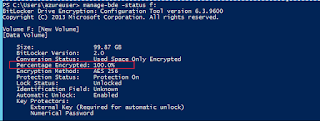
Also, it can been seen from the GUI of the server , the drives will have a lock signal associated

Now you know how to enable disk encryption for protection of data at rest in Azure!!!!
2.:Click on add from the bottom menu to add a new application. Select the first option, ie add an application my organization is developing

3. Provide name of the application in the next step

3. Add the Sign-on URL and App URI. You can enter any value here in URI format, it need not have to be an existing application. Only requirement is that it should be unique for an organization

4.Now click on configure, and copy the client Id of the application
5.Next we need the application key. This can be generated from the portal from under the keys session. Select duration as 1 year from the drop down. Once you save the configuration, a key will be displayed which can be copied over

6. Next step is to provide this application access to keyvault. It can be done from an Azure PowerShell window using the following command
Set-AzureRmKeyVaultAccessPolicy -VaultName $keyVaultName -ServicePrincipalName $aadClientID -PermissionsToKeys 'WrapKey' -PermissionsToSecrets 'Set' -ResourceGroupName $rgname
You have to set the variables $keyVaultName,$aadClientID,$rgname to have values of your keyvault name, client id of the application that we got at Step 4 above and Resource group name
Now you have the client id and the key that you will need during the ARM template execution. Now lets proceed with the VM disk encryption
Create a new encrypted VM using ARM template and KeyVault
Deploy the following template available in GitHub to encrypt a new VM : https://github.com/Azure/azure-quickstart-templates/tree/master/201-encrypt-create-new-vm-gallery-image
Click on the "deploy to Azure" option in the page to deploy the ARM template directly in Azure

Provide the mandatory parameter values like VM name, admin username, password, Storage account name, Virtual network, subnet,keyvault name and keyvault resource group along with the client ID and Client Secret of the Azure AD application that we created earlier. Additionally there will be two options for Key Encryption key and URL.It is not mandatory and we are not using that in this example. You can then agree to the terms and conditions , click on purchase and the deployment of encrypted VM will start
Encrypt an existing VM using ARM template and keyvault
Deploy the following template available in GitHub to encrypt an existing VM : : https://github.com/Azure/azure-quickstart-templates/tree/master/201-encrypt-running-windows-vm
Deploy the template to Azure and provide details of the VM that you want to encrypt.'Volume type' can be OS,Data or All(default value) depending on which disk you want to encrypt

Check encryption status
Now that you have enabled the encryption you might want to verify the status. There are few ways to check this.
Easiest way is to check from the Azure portal.Navigate to the Disks information of the VM from the portal. It will show the OS disk status as Encrypted.

The data disk encryption status is currently not reflected in the portal. However, you can check the data disk encryption status by using Azure PowerShell command Get-AzureRmVmDiskEncryptionStatus and providing resource group name and Vmname as parameters
Get-AzureRmVmDiskEncryptionStatus -ResourceGroupName $rgname -VMName $Vmname

You will see OSVolumeEncrypted and DataVolumesEncrypted status as True if encryption is enabled
You can also check the status of disk encryption from within the VM using ‘manage-bde’ command and providing the drive letter as parameter. Sample output given below

Also, it can been seen from the GUI of the server , the drives will have a lock signal associated

Disk encryption is only one of the security measures available in Azure. There are many other options like NSGs,Virtual appliances, UDRs etc that we discussed in the introduction. Also, there is a new service called Azure Security Center that takes cares of your Azure environment security requirements holistically . Keep watching this space for more information on it!!!
Note: This content is also published in my MSDN blog : https://blogs.msdn.microsoft.com/shijimolak/2017/01/29/os-and-data-disk-encryption-of-iaas-windows-vms/
https://azure.microsoft.com/en-in/documentation/articles/azure-security-disk-encryption/
This blog is really a great source of information for me. Thank you for sharing such a useful content about Cloud Security Remediation .
ReplyDelete